LoRaWAN Publication of Environmental Measurements with a LoRa-E5 Module
This tutorial explains how to implement a LoRaWAN publication on The Things Network (TTN) with a TagoIO integration using a MicroPython driver for a Grove LoRa-E5 module. it was originally posted on https://stm32python.gitlab.io/fr/docs/Micropython/grove/lora-e5 in French, and all credits go to Julien Terrier and Yannick Marietti.
To learn a little more about LoRa and LoRaWAN, you can consult this page. To really understand everything, read this document by Sylvain Montagny (University of Savoie—Mont Blanc). You will find other references at the end of this tutorial.
Required Materials and Assembly
- For the connected object (our NUCLEO-WB55 board), we chose a Grove LoRa-E5 module from Seeed Studio based on a System on Chip (SoC) STM32WLE5JC from STMicroelectronics.
- For the LoRaWAN gateway, we chose The Things Indoor Gateway (TTIG).
A TTIG LoRa-WiFi gateway
A Grove LoRa-E5 module
Our connected device will consist of the following components:
Place the Grove extension board on the NUCLEO board and connect the BME280 module (to an I2C connector) and the LoRa-E5 module (to the UART connector)
First step: Obtaining the DevEUI and DevAddr of the LoRa-E5 module
The Grove LoRa-E5 module connects to a serial port (UART) and is controlled using "AT commands". This means that Seeed Studio has programmed it with firmware that receives commands in text mode and responds to them, also in text, via the UART serial protocol. The same strategy is often used to control GPS, Wi-Fi, or Bluetooth modules. The documentation for the module's AT commands is available here.
In this first part, we will use an AT command to query the module and obtain its DevEUI, a unique identifier encoded on 64 bits that we will use for its registration on the TTN LoRaWAN network.
The MicroPython script
To send AT commands to the module and receive its responses, it is necessary to use a MicroPython script to communicate over the UART to which the module is connected. This is precisely the function of the following script, inspired by the examples given on this page.
Create a main.py script on your computer and copy the following code into it, then drag and drop it into PYBFLASH:
# Purpose of the script: Sending / Receiving messages via UART in command line mode
# This script is useful for communicating with modules equipped with AT firmwares.
from machine import UART # To control the UART
# Constants related to UART settings
DELAY_TIMEOUT = const(
1000
) # Duration (in milliseconds) during which the UART waits to receive a message
BAUDRATE = const(9600) # Communication speed, in bauds
UART_NUMBER = const(2) # Identifier of the NUCLEO-WB55 board's UART to be used
RX_BUFF = const(
512
) # Size of the reception buffer (received messages will be truncated
# to this number of characters)
EOC = "\r\n" # Command termination to validate sending
# UART initialization
uart = UART(UART_NUMBER, BAUDRATE, timeout=DELAY_TIMEOUT, rxbuf=RX_BUFF)
# UART reception interrupt service function
@micropython.native # Optimizes bytecode for STM32
def Reception(uart_object):
# Reading received characters
message_received = uart_object.read()
# If a message is received
if not (message_received is None):
# Display the received message
print("Message received: \r\n" + message_received.decode("utf-8"))
# Activating the UART interrupt (interrupt vector) for reception
irq_uart = uart.irq(Reception, UART.IRQ_RXIDLE, False)
# To handle sending messages
@micropython.native # Optimizes bytecode for STM32
def Emission():
print("Enter your command")
while True:
# Prompt for entering a message (via keyboard)
message_sent = input()
# Sending the entered message
uart.write(message_sent + EOC)
print("Sent: " + str(message_sent))
# Calling the main function
Emission()
It should be noted that the baud rate of the LoRa-E5 module is by default set to 9600. This can be changed by another AT command, but we do not advise you to do so without a good reason.
Implementation
Connect a PuTTY terminal to the board's firmware, as shown here (Windows systems), and start the script with [CTRL]-[D]. To make sure everything is working well, just type AT in the terminal, then ENTER. The PuTTY console should look like this:
MicroPython v1.20.0 on 2023-04-26; NUCLEO-WB55 with STM32WB55RGV6
Type "help()" for more information.
>>>
MPY: sync filesystems
MPY: soft reboot
Enter your command
AT
Sent: AT
Message received: +AT: OK
All is well; the module responded to you with +AT: OK, as expected.
Now, type AT+ID and ENTER, you should get a response in this form:
AT+ID
Sent: AT+ID
Message received:
+ID: DevAddr, 44:10:BA:4A
+ID: DevEui, 2C:F7:F1:20:44:10:BA:4A
+ID: AppEui, 00:00:00:00:00:00:00:00
Our module returns several keys useful for connecting it to a future LoRaWAN network which will, of course, be different for your module. The DevEui and DevAddr keys will be useful for us later on; note their values.
Second step:
- Creation of a private LoRaWAN network with the TTIG gateway
- Creation of a link between TTN and TagoIO integration
With this tutorial for configuring the gateway and all the services, which will allow us to collect the refer you toe measurements from the LoRa-E5 module first on TTN and then on TagoIO. You will need the DevEui key obtained at the first step to go all the way.
Third step: Connecting the LoRa-E5 module to the LoRaWAN network
With your private LoRaWAN network operational, you can now validate that your LoRa-E5 module can connect to it.
The MicroPython script
Start by copying the libraries to manage LoRa communication into the PYBFLASH folder; these are the stm32_driverAT.py and stm32_LoRa.py files. Our partner, Vittascience, shared these libraries online here. They were developed for the Connected Measurement Station kit—Nucleo L476 version.
Then create a main.py script on your computer and copy the following code into it, then drag and drop it into PYBFLASH:
# Purpose of the script:
# Validate the connection of a LoRa-E5 module to a private LoRaWAN network on TTN,
# previously configured.
# This example is obtained from resources made available by
# Vittascience:
# Importing different drivers
import machine
from stm32_LoRa import *
from utime import sleep_ms
# Serial port of the NUCLEO_WB55
UART_WB55 = const(2)
# Identifiers on the LoRaWAN network
devAddr = "44 10 BA 4A"
appEui = "00 00 00 00 00 00 00 00"
appKey = "55 10 67 98 B2 15 EE 4E D0 33 19 DC 65 27 88 AB"
# Various delays
DelayRebootLostConnection = 300 # Expressed in minutes
DelayTryJoin = 10 # Expressed in seconds
MaxTryJoin = int((DelayRebootLostConnection * 60) / DelayTryJoin)
DelaySend = 30 # Expressed in seconds
# Initialization of the LoRa-E5 module
loRa = LoRa(9600, UART_WB55, DataReceiveCallback=None)
# Identification parameters of the module for its connection to the LoRaWAN network
status = loRa.setIdentify(DevAddr=devAddr, AppEui=appEui, AppKey=appKey)
# Display of the different parameters of the LoRaWAN network
def PrintLoRaParameters():
identify = loRa.getIdentify()
if identify != -1:
print("#####################################################################")
print("########## INITIALIZE ########")
print("#####################################################################")
print("LORA_DRIVER_VERSION: " + loRa.getDriverVersion())
print("#### " + loRa.getMode() + " ####")
print("#### AppKey: " + identify["AppKey"])
print("#### DevEUI: " + identify["DevEui"])
print("#### AppEUI: " + identify["AppEui"])
print("#### DevAddr: " + identify["DevAddr"])
else:
print("#### = Read identify fail.\nReboot!")
sleep_ms(2000)
machine.reset()
if status == -1:
print("#### = Initialize fail.\nReboot!")
sleep_ms(2000)
machine.reset()
else:
print("#### = Initialize success.")
# Establishing the LoRaWAN connection ("join")
def JoinNetwork():
# Tries to connect to the network
joinStatus = False
tryJoin = 0
while joinStatus == False:
# Join LoRaWAN
print("#### = Try join n°" + str(tryJoin + 1))
status = loRa.join()
if status == -1:
print("#### = Join Fail, retry in " + str(DelayTryJoin) + " seconds.")
tryJoin += 1
# If MaxTryJoin connection attempts have failed
if tryJoin > MaxTryJoin:
# Reboot the board
print("Reboot!")
machine.reset()
sleep_ms(DelayTryJoin * 1000)
else:
joinStatus = True
print("#### = Join success.")
# Execution of functions
PrintLoRaParameters() # Display parameters
JoinNetwork() # Join
Implementation
Press [CTRL]-[D] in the PuTTY terminal. If everything is correct, you should see in the terminal the confirmation of the LoRaWAN "join" (message "Join success"):
MicroPython v1.20.0 on 2023-04-26; NUCLEO-WB55 with STM32WB55RGV6
Type "help()" for more information.
>>>
MPY: sync filesystems
MPY: soft reboot
#####################################################################
########## INITIALIZE ########
#####################################################################
LORA_DRIVER_VERSION: 1.0.1
#### LWOTAA ####
#### AppKey: "55 10 67 98 B2 15 EE 4E D0 33 19 DC 65 27 88 AB"
#### DevEUI: 2C F7 F1 20 42 00 1A 4A
#### AppEUI: 00 00 00 00 00 00 00 00
#### DevAddr: 44 10 BA 4A
#### = Initialize success.
#### = Try join n°1
#### = Join success.
MicroPython v1.20.0 on 2023-04-26; NUCLEO-WB55 with STM32WB55RGV6
Type "help()" for more information.
>>>
Finally, if you go to the TTN site with a web browser, on this page (of course, after having followed the tutorial of the Second step by step!), you should also find the confirmation of the "join":
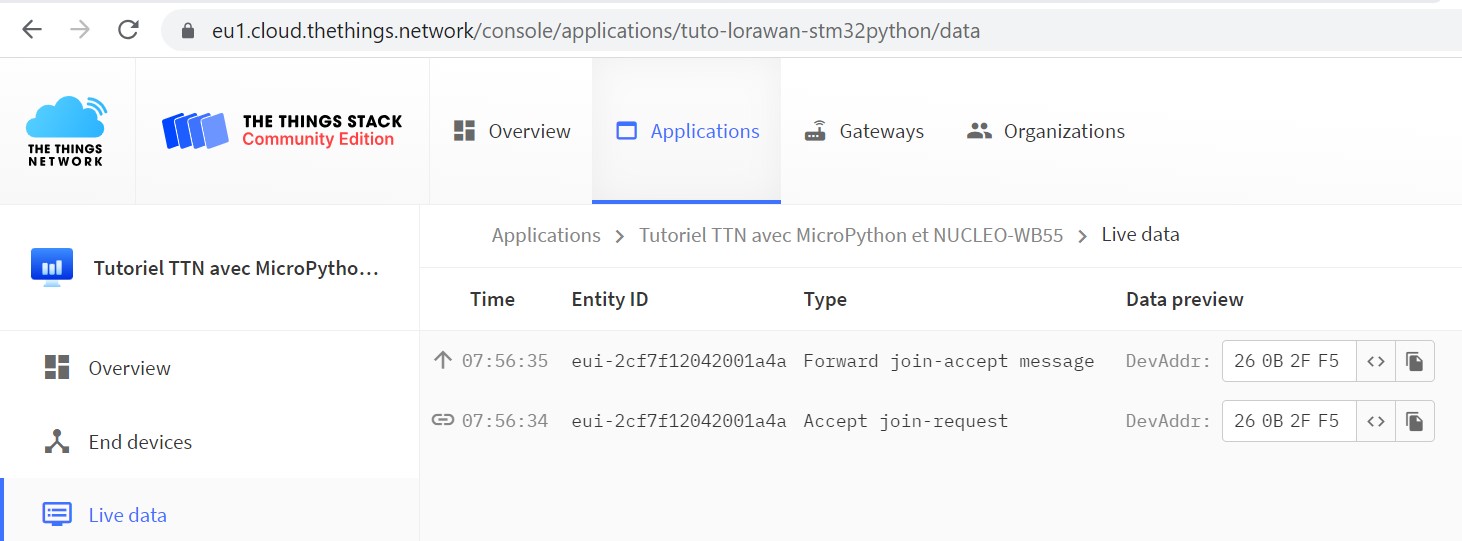
Great! Your device is now connected, and you can use it to post measurements on the Internet!
Addition: Using Vittascience's online IDE to generate a MicroPython script
To save time on creating the preceding main.py, we used the online block programming interface of the company Vittascience for the NUCLEO-L476RG, which offers automatic LoRaWAN code generation for MicroPython
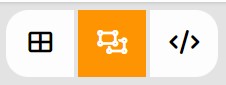
- We started by setting the interface to hybrid mode with this button,
so as to visualize both the block code and MycroPython in the IDE window:
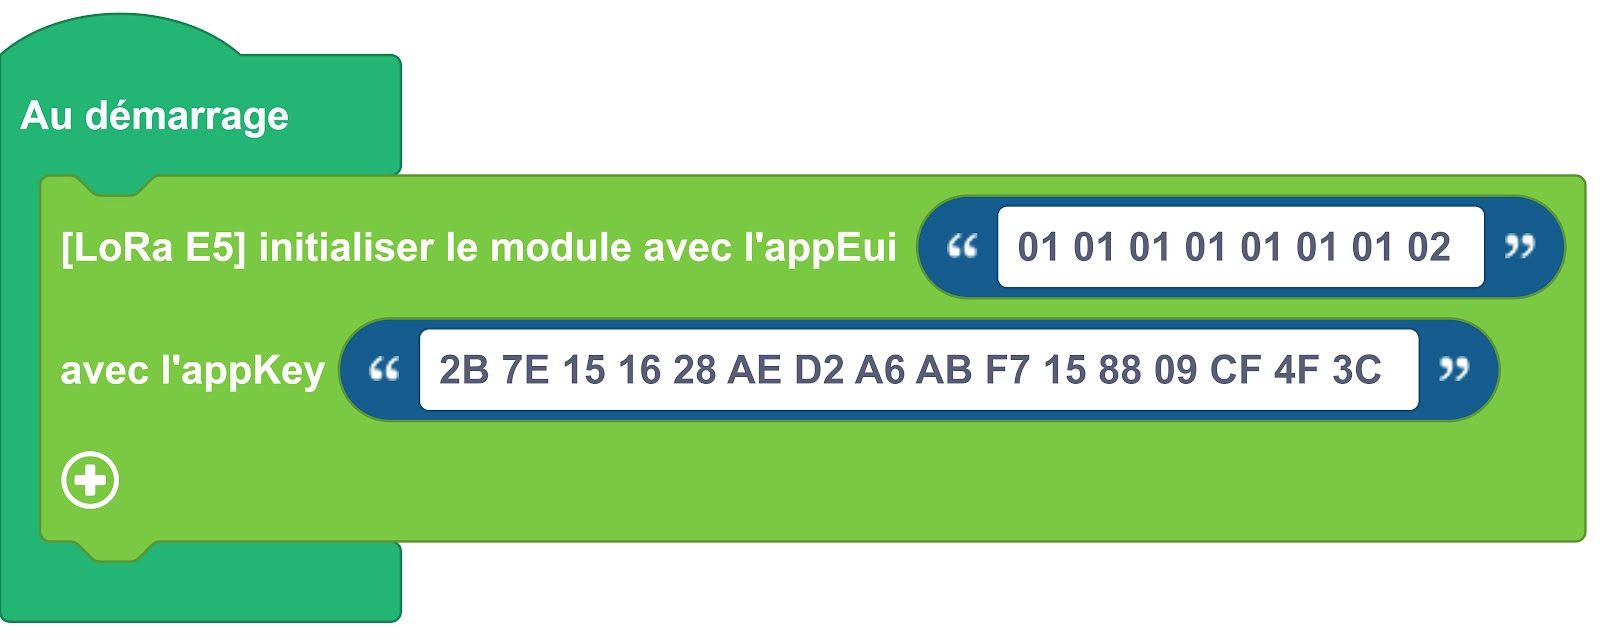
- Then we dragged and dropped the [LoRa E5] block to initialize the module with the appEUI "..." available in the Communication toolbox inside the On Start block:
- Finally, we copied the MicroPython code from the right pane of the browser into a text file, before tweaking it with Notepad++, to end up with the script displayed above.
We proceeded in the same way for the main.py script of the fourth part that follows, by adding a [LoRa E5] block to send data configured for three sensors among those available with the Vittascience IDE, and then modifying it to adapt it to our example.
Fourth Step: Publishing BME280 Measurements on the LoRaWAN Network
Now that your LoRa-E5 module is registered on TTN and we have verified that it connects there, we can focus on the MicroPython script that will allow it to post its temperature, humidity, and pressure measurements in a compact hexadecimal format suitable for LoRaWAN frames. This means we will also need to configure a script in NodeJS language on our TagoIO account to "decode" these LoRaWAN frames before displaying them on a dashboard.
The MicroPython Script
Start by copying stm32_driverAT.py, stm32_LoRa.py, and bme280.py into PYBFLASH. Then create a main.py script on your computer and copy the following code into it, then drag and drop it into PYBFLASH:
# Purpose of the script:
# Connecting a LoRa-E5 module to a private LoRaWAN network on TTN, previously configured.
# Publishing temperature, humidity, and pressure data on TTN in a hexadecimal format that will then need to be "decoded" by a payload parser on TagoIO.
# This example is obtained from resources made available by
# Vittascience:
# Importing different drivers
import machine
from stm32_LoRa import *
from utime import sleep_ms
# Serial port of the NUCLEO_WB55
UART_WB55 = const(2)
# Identifiers for the LoRaWAN network
devAddr = "44 10 BA 4A" # Obtained with the AT+ID command addressed to the module
appEui = "00 00 00 00 00 00 00 00" # Keep this value
appKey = "55 10 67 98 B2 15 EE 4E D0 33 19 DC 65 27 88 AB" # Obtained by TTN
# Various delays
DelayRebootLostConnection = 300 # Expressed in minutes
DelayTryJoin = 10 # Expressed in seconds
MaxTryJoin = int((DelayRebootLostConnection * 60) / DelayTryJoin)
DelaySend = 30 # Expressed in seconds
# Callback function responsible for processing and reacting to messages sent by the #LoRaWAN server to the LoRa-E5 module
def DataReceived(Port=0, DataReceived=b""):
print("#### = Data received")
print(
"Data received on PORT: "
+ str(Port)
+ ", Size = "
+ str(len(DataReceived))
+ ", Data = "
+ str([hex(x) for x in list(DataReceived)])
)
# Initialization of the LoRa-E5 module
loRa = LoRa(9600, UART_WB55, DataReceiveCallback=DataReceived)
# Identification parameters of the module for its connection to the LoRaWAN network
status = loRa.setIdentify(DevAddr=devAddr, AppEui=appEui, AppKey=appKey)
# Displaying the different parameters of the LoRaWAN network
def PrintLoRaParameters():
identify = loRa.getIdentify()
if identify != -1:
print("#####################################################################")
print("########## INITIALIZE ########")
print("#####################################################################")
print("LORA_DRIVER_VERSION : " + loRa.getDriverVersion())
print("#### " + loRa.getMode() + " ####")
print("#### AppKey: " + identify["AppKey"])
print("#### DevEUI: " + identify["DevEui"])
print("#### AppEUI: " + identify["AppEui"])
print("#### DevAddr: " + identify["DevAddr"])
else:
print("#### = Read identify fail.\nReboot!")
sleep_ms(2000)
machine.reset()
if status == -1:
print("#### = Initialize fail.\nReboot!")
sleep_ms(2000)
machine.reset()
else:
print("#### = Initialize success.")
# Establishing the LoRaWAN connection ("join")
def JoinNetwork():
# Try to join network
joinStatus = False
tryJoin = 0
while joinStatus == False:
# Join LoRaWAN
print("#### = Try join n°" + str(tryJoin + 1))
status = loRa.join()
if status == -1:
print("#### = Join Fail, retry in " + str(DelayTryJoin) + " seconds.")
tryJoin += 1
if tryJoin > MaxTryJoin:
# Reboot board
print("Reboot!")
machine.reset()
sleep_ms(DelayTryJoin * 1000)
else:
joinStatus = True
print("#### = Join success.")
# Sending frames in a hexadecimal format containing measurements from the BME280
def GetSendData():
# Delay in milliseconds, frequency of frame transmission
TEMPO = const(600000)
from time import sleep_ms # For delaying
from machine import I2C # I2C bus driver
import bme280 # Sensor driver
# Using I2C n°1 of the NUCLEO-WB55 board to communicate with the sensor
i2c1 = I2C(1)
# One-second pause to allow I2C time to initialize
sleep_ms(1000)
# List of I2C addresses of present devices
print("I2C addresses used: " + str(i2c1.scan()))
# Instantiating the sensor
sensor = bme280.BME280(i2c=i2c1)
# Counting the attempts to send a frame
trySend = 0
# Number of bytes in the frame
NB_BYTES = const(5)
# Initializing an array of NB_BYTES bytes that will contain the LoRaWAN frame
loRaFrame = [0x00] * NB_BYTES
while True:
# Reading measured values
bme280data = sensor.values
# Preparing the measurements
temp = bme280data[0]
press = bme280data[1]
humi = bme280data[2]
# Displaying the measurements
print("=" * 40) # Prints a separation line
print("Temperature: %.1f °C" % temp)
print("Pressure: %d hPa" % press)
print("Relative Humidity: %d %%" % humi)
# Converting temperature, pressure, and humidity measurements to integers
temp = int(temp * 10)
press = int(press * 10)
humi = int(humi * 2)
# Building the LoRaWAN frame, directly aggregating the data in hexadecimal format
# Temperature, data encoded on 16 bits
loRaFrame[0] = (temp >> 8) & 0xFF # Extracting the low-weight byte
loRaFrame[1] = temp & 0xFF # Extracting the high-weight byte
# Pressure, data encoded on 16 bits
loRaFrame[2] = (press >> 8) & 0xFF # Extracting the low-weight byte
loRaFrame[3] = (
press & 0xFF
) # Data encoded on 16 bits, extracting the high-weight byte
# Humidity, data encoded on a single byte
loRaFrame[4] = humi
# Transmitting the LoRaWAN frame
print("#### = Send data.")
trySend += 1
sendStatus = loRa.sendData(loRaFrame, Port=1, NeedAck=False)
# If transmission fails, retry trySend times then force a reset of the STM32WB55
if sendStatus == -1:
print("#### = Join fail.")
if trySend > MaxTrySend:
print("Reset!")
machine.reset()
else:
print("#### = Send success.")
trySend = 0
# Putting the LoRa-E5 module into low power mode
print("#### = LoRa module enter low power mode.")
loRa.enterLowPowerMode()
# Delaying until the next frame is sent
sleep_ms(TEMPO)
# Putting the STM32WB55 into low power mode
pyb.wfi()
# Executing the functions
PrintLoRaParameters() # Displaying the parameters
JoinNetwork() # Connecting to TTN
GetSendData() # Transmitting frames to TagoIO
Important: devAddr, appEUI, and appKey
In order for the device to establish a connection with the TTN servers, you must correctly fill in the values of devAddr, appEUI, and appKey.
- The value of devAddr is obtained by querying the LoRa-ET module (see the first part of this tutorial).
- The value of appEui must remain at '00 00 00 00 00 00 00 00'
- The value of appKey is obtained at the time of creating an application (see this other tutorial).
Optional: Configuration of communication channels for TTN
The IoT blog disk91.com reports, in its review of the LoRa-E5 module, that it is necessary to send the following AT commands to the module to optimally configure communication with TTN:
#channel configuration for Europe
AT+CH=3,867.1,DR0,DR5
AT+CH=4,867.3,DR0,DR5
AT+CH=5,867.5,DR0,DR5
AT+CH=6,867.7,DR0,DR5
AT+CH=7,867.9,DR0,DR5
Ideally, these commands should be integrated into the initialization of the LoRaWAN stm32_LoRa.py driver.
Implementation
Press [CTRL]-[D] in the PuTTY terminal. If everything is correct, you should read in the terminal the confirmation of regular publication, every ten minutes, of LoRaWAN frames intended for the TTN servers:
>>>
MPY: sync filesystems
MPY: soft reboot
#####################################################################
########## INITIALIZE ########
#####################################################################
LORA_DRIVER_VERSION: 1.0.1
#### LWOTAA ####
#### AppKey: "55 10 67 98 B2 15 EE 4E D0 33 19 DC 65 27 88 AB"
#### DevEUI: 2C F7 F1 20 42 00 1A 4A
#### AppEUI: 00 00 00 00 00 00 00 00
#### DevAddr: 44 10 BA 4A
#### = Initialize success.
#### = Try join n°1
#### = Join success.
I2C addresses used: [118]
========================================
Temperature: 23.7 °C
Pressure: 628 hPa
Relative humidity: 66 %
#### = Send data.
#### = Send success.
#### = LoRa module enter low power mode.
========================================
Temperature: 25.0 °C
Pressure: 958 hPa
Relative humidity: 47 %
#### = Send data.
#### = Send success.
#### = LoRa module enter low power mode.
Supplement: Downlink and receipt callback?
The script above contains a function responsible for processing upon receiving downlink data from the TTN server on the LoRa-E5 module:
# Callback function responsible for processing and reacting to messages sent by the LoRaWAN server to the LoRa-E5 module
def DataReceived(Port = 0, DataReceived = b''):
print("#### = Data received")
print("Data received on PORT: " + str(Port) +
", Size = "+ str(len(DataReceived)) +
", Data = "+str([hex(x) for x in list(DataReceived)]))
list(DataReceived)]))
The LoRaWAN protocol indeed allows for two-way communication between object and server. In the case of the "free" TTN application that we use, this function is not very useful, but we can still verify that it works.
To send a message from TTN to the LoRa-E5 module…
- Go to your device's page;
- Then, in the vertical menu on the left, choose End device;
- Select the Messaging submenu;
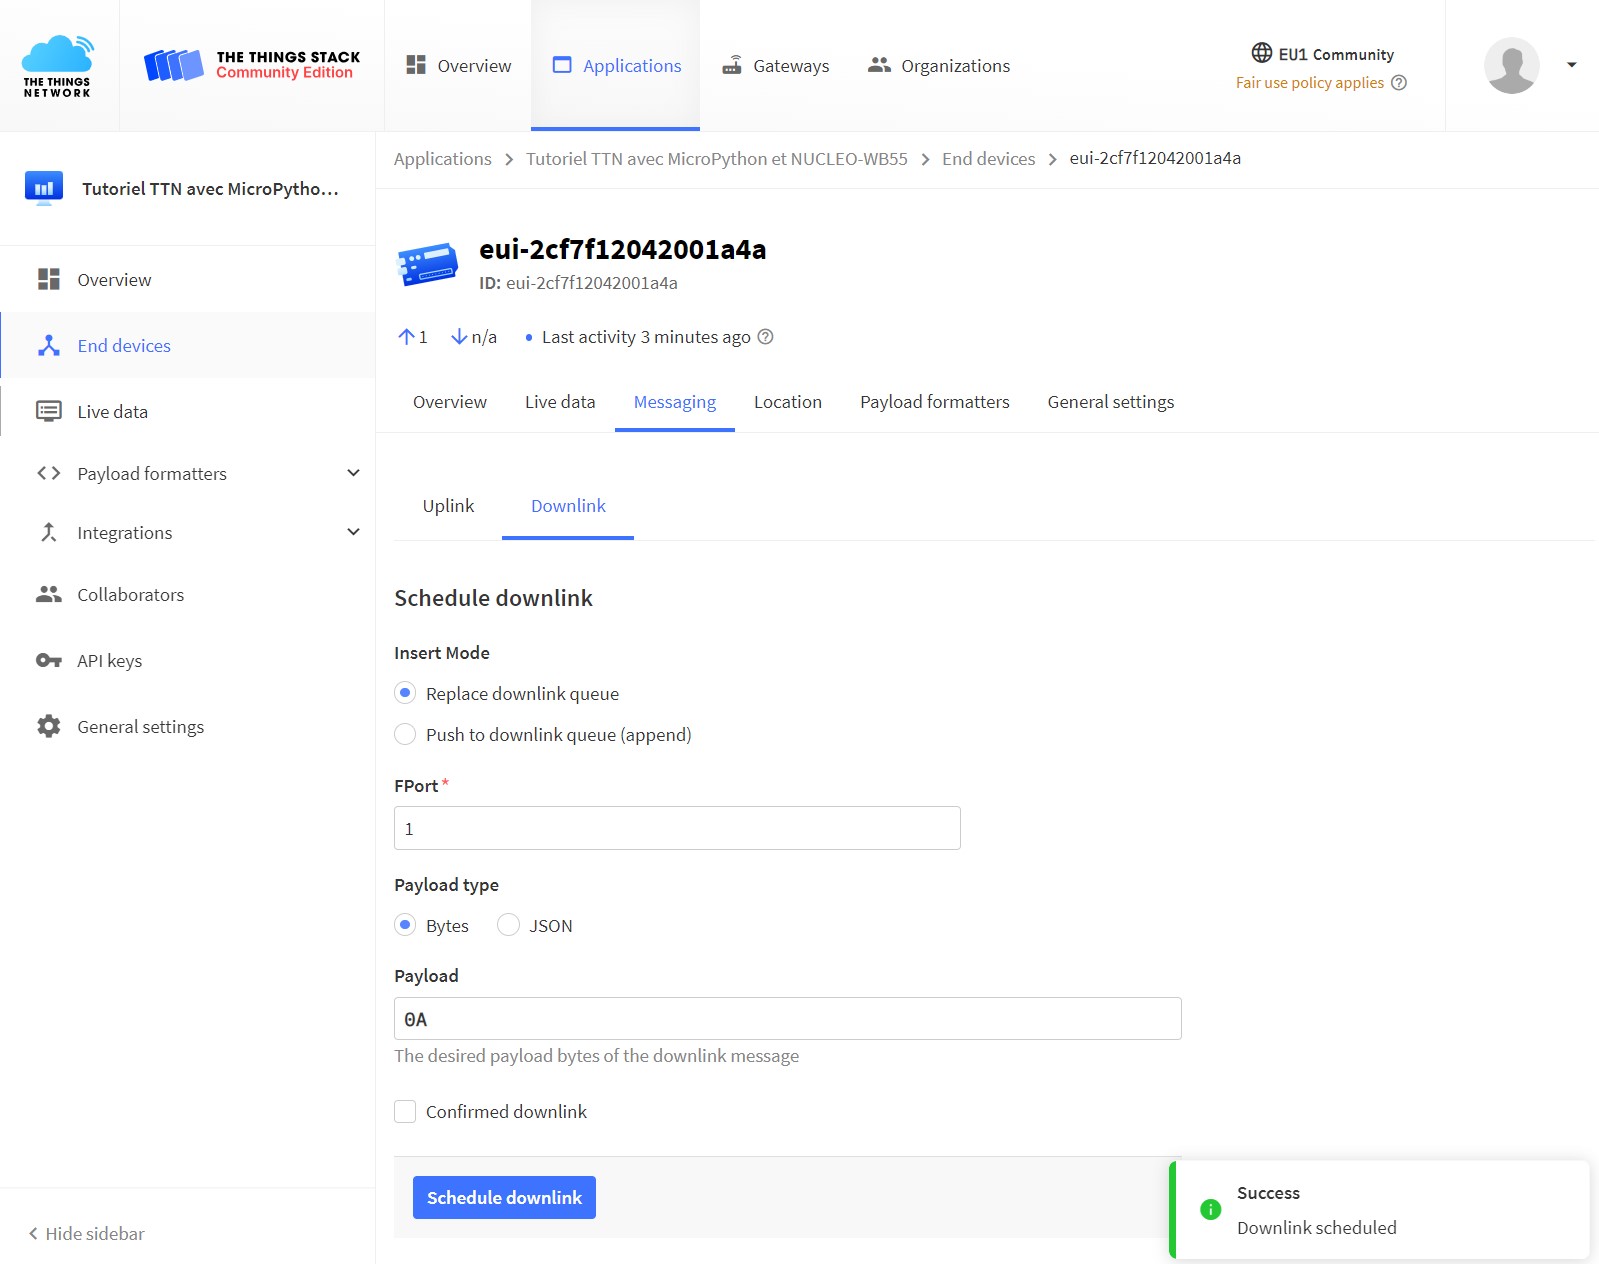
- Select the Downlink sub-submenu;
- Finally, enter a hexadecimal value in the Payload box (two characters, simply "0A" in our case) and click on the Schedule downlink button at the bottom. A Downlink scheduled message, at the bottom right, confirms that the operation is planned. For our device, here is what the downlink page on the TTN site looks like at that moment:
- You need to wait for the next uplink from the LoRa-E5 module to the TTN server. Once this is done, the server's message is well received by the module, as confirmed by the logs on the PuTTY terminal:
========================================
Temperature: 26.4 °C
Pressure: 957 hPa
Relative Humidity: 52 %
#### = Send data.
#### = Data received
Data received on PORT: 1, Size = 1, Data = ['0xA']
#### = Send success.
#### = LoRa module enter low power mode.
Visualization of measurements on TTN then on TagoIO
Visualization on TTN
The frames are first sent from the NUCLEO-WB55, via the LoRa-E5 module, to the gateway, which then communicates them to the TTN server. We can therefore check that the latter receives them as expected. Log in to your application page (we refer you to the tutorial of the second step):
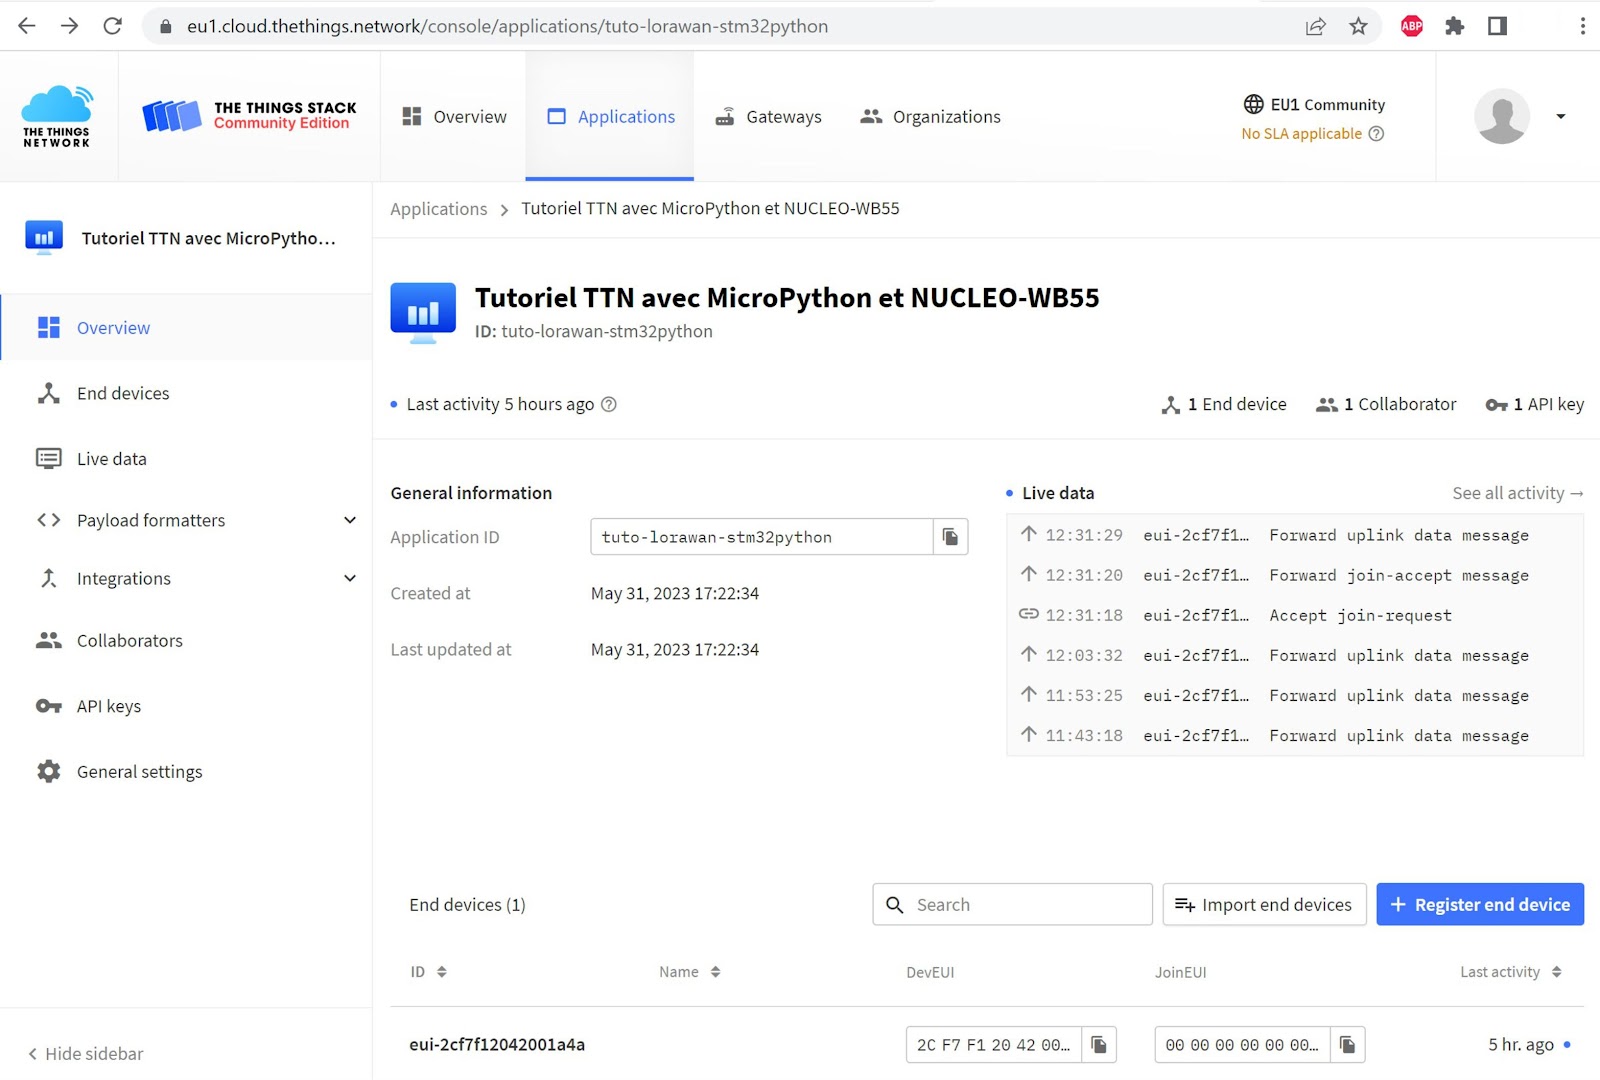
By clicking on the "See all activity" link (in the middle, on the right), you will have access to all transactions, timestamped.
Visualization on TagoIO: "parsing" of LoRaWAN frames and creation of a dashboard
To visualize the data received on TTN in a TagoIO integration…
The first step is to create a webhook, a link, between these two platforms. The corresponding procedure is given at the end of this other tutorial that you should have already followed at this stage.
The second step is to configure a LoRaWAN "payload parser" in your TagoIO account, so that it can transform the hexadecimal data it receives from TTN into readable values of temperature, pressure, and humidity (for our example in particular). To do this, once in your TagoIO account…
- Click on the Devices button, then double click on the device line.
- Click on the Payload Parser tab.
- In the Payload Parser tab, activate the switch Run your own parser.
- Paste your LoRaWAN payload parser script into the text box titled Load as snippet. To avoid making this very long tutorial even longer, we do not reproduce this parser script here, you will find it in the ZIP archive downloadable inside the Parser_LoRaWAN.txt file of the folder \Publication LoRaWAN module LoRa-E5\4 - Publication LoRaWAN.
If you have followed the instructions correctly, your browser should display something like this:

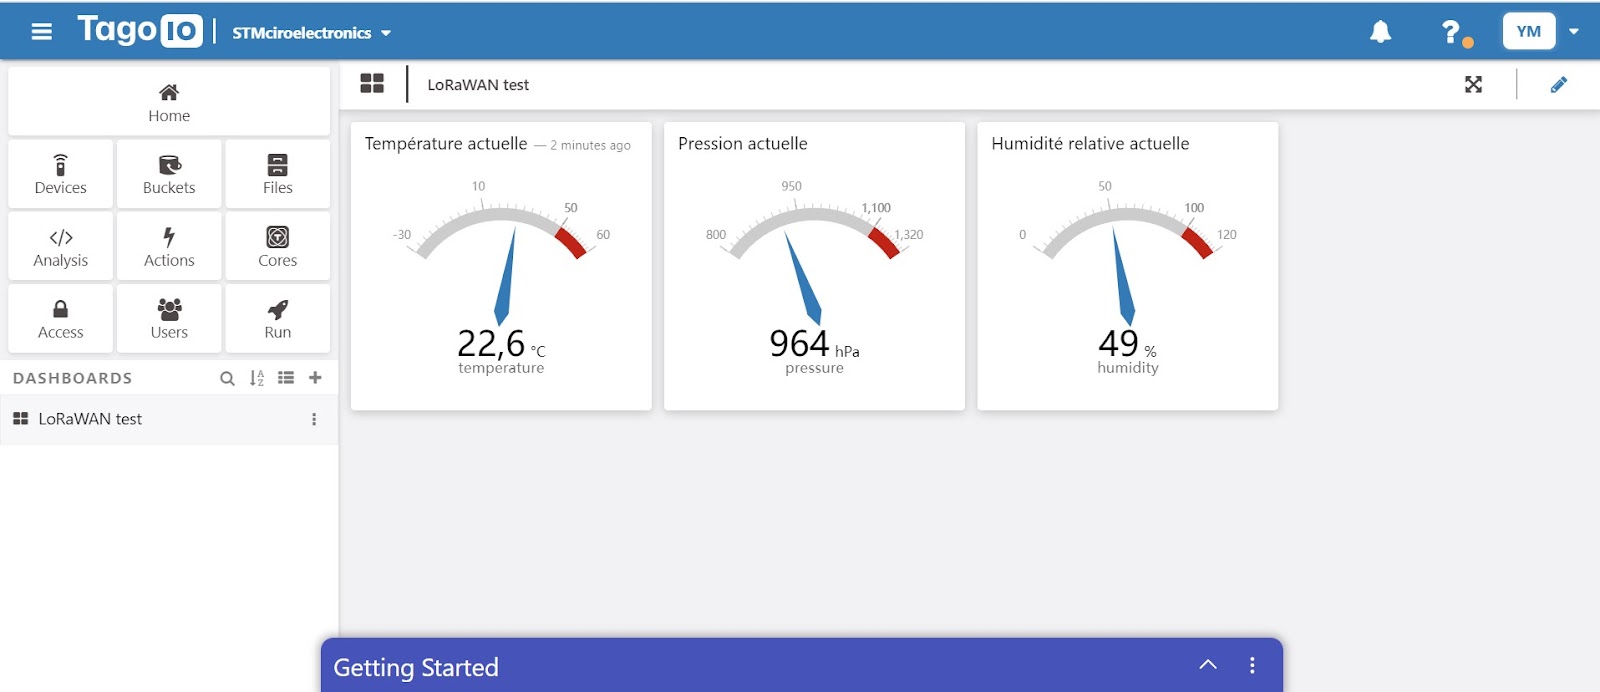
The third and final step is to create a TagoIO dashboard by following the instructions in this other tutorial. To give you an idea, here is a dashboard created in a few minutes, consisting of three gauges (the "widgets") displaying the measurements from our BME280 sensor:
This tutorial is now complete!
The possibilities offered by TTN and TagoIO are impressive. We leave it to you to delve deeper into these topics that we have only touched upon despite the respectable size of this tutorial.
Links and resources
On LoRa and LoRaWAN in general:
Our dedicated tutorial covers the installation of a TTIG gateway, which also provides other references.
On TagoIO integration:
Regarding the LoRa-E5 module, two resources that also explain how to set up a private LoRaWAN network on TTN:
Related Articles
The Things Network LoRaWAN™
This tutorial provides a step-by-step guide to integrate The Things Network (TTN) with the TagoIO Platform. By following these instructions, you will enable uplink and downlink operations, allowing data exchange between your LoRaWAN devices and the ...Everynet LoRaWAN
This tutorial provides a step-by-step guide to integrate Everynet LoRaWAN with the TagoIO Platform. By following these instructions, you will enable uplink and downlink operations, allowing data exchange between your LoRaWAN devices and the TagoIO ...Displaying Locations on a Map with TTN LoRaWAN
If you have a custom payload format decoder at TTN (The Things Network), you can send your payload variables directly to TagoIO. To display locations on a Map, your data needs to be sent inside the "location" field with the format shown below: { ...Orbiwise LoRaWAN™
This tutorial provides a step-by-step guide to integrate Orbiwise LoRaWAN™ with the TagoIO Platform. By following these instructions, you will enable uplink and downlink operations, allowing data exchange between your LoRaWAN devices and the TagoIO ...machineQ LoRaWAN™
This tutorial provides a step-by-step guide to integrate machineQ LoRaWAN with the TagoIO Platform. By following these instructions, you will enable uplink and downlink operations, allowing data exchange between your LoRaWAN devices and the TagoIO ...